How to turn your bland blob of light into a moonlight memory
To aid you in your next moonlight photography expedition, consider these pointers when taking your pictures.
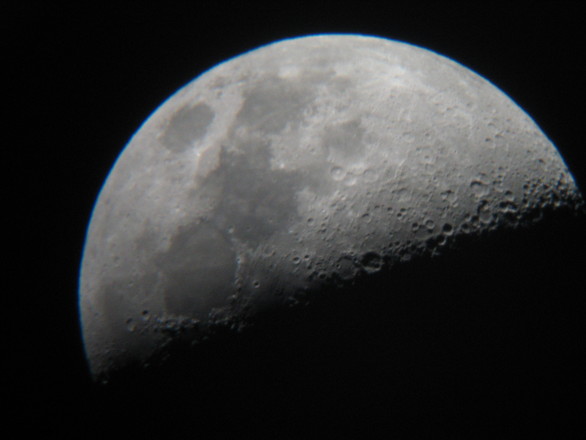
We have all experienced the frustration that comes with trying to take an epic picture of the full moon when in reality all we end up capturing is a bland blob of bright light.
Trying to use words via a text message to explain to someone what the moon looked like is also not as effective as taking a photo where even the craters on the moon are defined in three dimensions.
Often, the reason why a camera isn’t able to recognise the detail, or to capture it, is the fact that the moon reflects a lot of light. You need to change the settings on your camera to counteract the light.
To aid you in your next moonlight photography expedition, consider the following pointers:
If you have a single-lens reflex (SLR) camera, (that’s a camera with a detachable lens) it is easy to make adjustments to the manual settings to take good pictures of the moon.
However, there are three light settings you need to understand before you start making changes to them. There are three things that ‘change’ light on a picture: ISO, shutter speed and aperture (F-stop).

Photo: Boredpanda
ISO intensifies light. It makes the image brighter. A low ISO number means there is less light going into the lens and the image will thus be darker. If you increase the ISO, more light will flow into the lens and the image will become lighter. Having an ISO setting of 100 means the photo will be dark. Having an ISO setting of 1 200 means the image will be a lot lighter. To take pictures of the moon, keep your ISO setting as low as possible.
Shutter speed is equal to the blink of an eye. The longer you keep your eyes open, the more light goes into your eyes and the more you can see. If you open your eyes quickly and close them quickly again, the image you see in that split second will be darker. Shutter speed works exactly the same. The longer your shutter (the camera’s eye) stays open, the lighter your picture will be and vice versa. Shutter speed is measured in fractions of a second and is identified by a one-slash icon before a number.
For example, the shutter speed 1/250 means the lens will open and close within one 250th of a second. This is a very fast speed which means very little light will enter the lens. If you slow down the shutter speed, the reading on the dial will change, to 0″1. This is one second. Opening the lens for one second means a lot of light comes into the lens and the photo will be brighter. Keep your shutter speed relatively slow (between 1/20 and 1.50) while taking pictures of the moon.

The F-stop has more to do with focus than with light, but can help you to counteract the brightness of the moon. If the F-stop number is low, a lot of light flows into the camera and the photo will be brighter. As you increase the F-stop number, less and less light will flow into the camera making the pictures darker. Keep your F-stop as high as possible while taking pictures of the moon.
Easy steps to taking better moon pictures:
1. As a starting point. decrease your camera’s ISO to the lowest number. Then use both shutter speed and F-stop to counteract too much light.
2. Turn your shutter speed down to at least 1/30. This means more light, but will increase the detail if used with F-stop.
3. Turn the F-Stop to a larger number, more or less to F9.0. This makes the image dark enough to show lots of the details of the moon.
4. Play around with shutter speed and F-stop to see what settings works best.
To sum up: Keep your ISO number as low as possible, set your shutter speed slower, and turn your F-stop to a large number.
The same techniques can be used on ordinary cameras with manual functions, and smartphones with manual functions can also help you to take stunning photos of the moon.
Read more:
Strawberry moon coincides with winter solstice
Krugersdorp sees a blood moon rising
A facelift for the Moon every 81,000 years
Don’t miss the biggest supermoon since 1948