Build your own herb planter
Materials: • 2 x 1.83m lengths of 144x12mm SA pine • 1 x 1.83m length of 32x44mm SA pine • 2 x 1.83m lengths of 9×44 cover strip • 1 bag 25mm panel pins • Eight 30mm mirror screws with chrome domes • 4 casters with small screws to suit • Water-proof glue • Finish …
Materials:
• 2 x 1.83m lengths of 144x12mm SA pine
• 1 x 1.83m length of 32x44mm SA pine
• 2 x 1.83m lengths of 9×44 cover strip
• 1 bag 25mm panel pins
• Eight 30mm mirror screws with chrome domes
• 4 casters with small screws to suit
• Water-proof glue
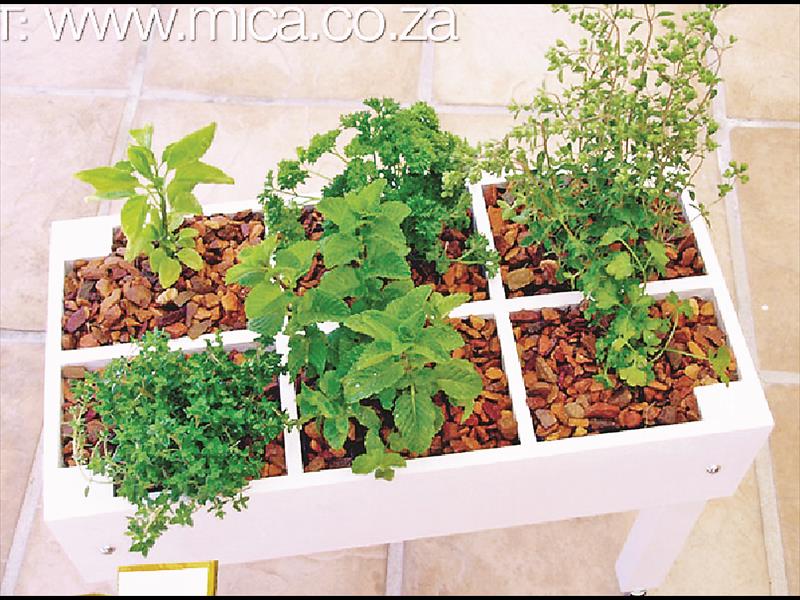
• Finish of your choice – water-base gloss white in the photo.
• To complete the unit you will need the herbs, cacti or whatever plants you are using, a couple of square metres of 250 micron plastic sheet; a small bag of potting soil and a small bag of granite chips (optional).
Method:
1. The herb planter’s external dimensions are 600mm long, 300mm wide and 540mm high (the 40mm coming courtesy of the casters, so cut the two sides 600mm long.
2. Cut two ends 276mm long – this is how they fit together.
3. Cut the 500mm legs and glue them to the sides.
4. Apply glue and clamp the legs and the sides firmly together to create the basic unit.
5. The compartment dividers are three lengths of 144×12 – two are 276mm long and the centre length is 600 – 24 = 576mm long. The cross pieces are therefore at 192mm centres.
6. Position each piece against each other centred on the marks you have made, and mark off the thickness of the wood.
7. All of the cuts marked off for the dividers. Now cut the slots, slightly more than halfway, but cut slightly inside the lines to ensure a snug fit.
8. The cuts are then knocked out and you can do a dry fit.
9. Since the dividers are flush with the top, but have cases of 9x44mm cover strip, you need to trim them by 18mm in depth.
10. Check that everything fits together snugly.
11. Then fix the dividers in position with a couple of 25mm panel pins to both ends of each.
12. Cut four cover strips to fit snugly between the dividers.
13. The two centre cover strips meet in the centre.
14. This is how the cover strips are positioned – the gaps are there to allow water to drain from the soil without rotting the wood. Panel pins driven in at regular intervals will ensure the base supports the soil and plants in the compartments.
15. Cut two final lengths of cover strip to support the ends of the base cover strips.
16. Give the unit a good sanding.
17. Then apply the finish of your choice; a spray gun is ideal for jobs like this one.
18. Once the finish has dried, fit the casters (they are optional, but they make it very easy to move the unit in and out of cover as necessary).
19. When planting the herbs, cut a piece of 250 micron plastic oversize, position it carefully, and cut or poke a couple of drainage holes in it, but in the gaps between the cover-strip base so that excess water drains out and falls free – rather than straight on to the cover strips where it will create problems.
Use your fingers to create a convex surface to the plastic between the gaps to ensure water falls free without wetting the wood. Trim off the excess plastic once the herbs have been planted.
Stay in the loop with The North Coast Courier on Facebook, X, Instagram & YouTube for the latest news.
Mobile users can join our WhatsApp Broadcast Service here, or if you’re on desktop, scan the QR code below.